Imagine you’re a sales rep who has closed a big deal. Your client is excited, but there’s a problem: the project is running behind schedule because the sales and project teams aren’t in sync. This is common for businesses that use different tools for managing projects and customer relationships.
Connecting Asana and Salesforce solves it. By integrating them, you create a single workflow that improves productivity and eliminates the hassle of manually transferring information.
In this article, we’ll explore the benefits of integration, walk you through the process of setting it up using Workato, and provide real-world examples to illustrate its power.
What Is Asana? A Quick Overview
Asana is a popular project management tool that helps teams organize, prioritize, and track their work. Key features include the following:
- Task management: Create, assign, and manage tasks with deadlines, priorities, and dependencies.
- Project boards: Visualize project progress and track task completion using Kanban boards.
- Team collaboration: Communicate within tasks, share updates, and collaborate on documentation.
- Custom workflows: Automate tasks, assign work based on criteria, and streamline repetitive processes.
What Is Salesforce? A Quick Overview
Salesforce is a leading CRM platform that helps businesses manage customer interactions, track sales opportunities, and optimize customer service. Key features include the following:
- Customer relationship management: Manage leads, opportunities, accounts, and contacts; track the sales pipeline; and analyze sales performance.
- Service cloud: Provide exceptional customer support with case management, knowledge bases, and live chat.
- Marketing cloud: Create and manage marketing campaigns, personalize customer experiences, and track marketing performance.
- AppExchange: Access a vast library of apps and integrations to extend Salesforce functionality.
Why Integrate Asana and Salesforce?
Integrating Asana and Salesforce brings significant benefits to your business’s efficiency and performance.
Streamlined Project Management
- Challenge: Tasks get lost, deadlines are missed, and projects fall behind schedule.
- Solution: Automating task creation in Asana for new leads in Salesforce keeps everyone informed and on track.
Enhanced Sales Performance
- Challenge: Sales reps lack real-time project status information.
- Solution: Updating Salesforce opportunities based on Asana task status provides valuable insights and allows for timely adjustments.
Improved Customer Communication
- Challenge: Customer support agents struggle to access project information related to customers.
- Solution: Linking customer records in Salesforce with related Asana tasks provides agents with a comprehensive view for better support.
Increased Team Productivity
- Challenge: Repetitive tasks consume valuable time.
- Solution: Automating tasks like status updates and project assignments frees up the team for strategic work.
Step-by-Step Guide: Setting up Asana and Salesforce Integration with Workato
Workato is a powerful automation platform that simplifies the process of connecting Asana and Salesforce. Here’s how to get started:
Prerequisites for Integration
Before you dive into setting up your Asana and Salesforce integration, make sure you have the following prerequisites in place:
- A Workato account
- A Salesforce and Asana account with administrator privileges
- Basic understanding of both platforms’ functionalities
- Access to relevant data
Step 1: Creating a Project on Workato
If you don’t have an existing Workato account, visit https://www.workato.com/ and sign up for a free trial.
- Log in to your Workato account dashboard. Then navigate to the “Project” tab and click “Create project” to create a project.
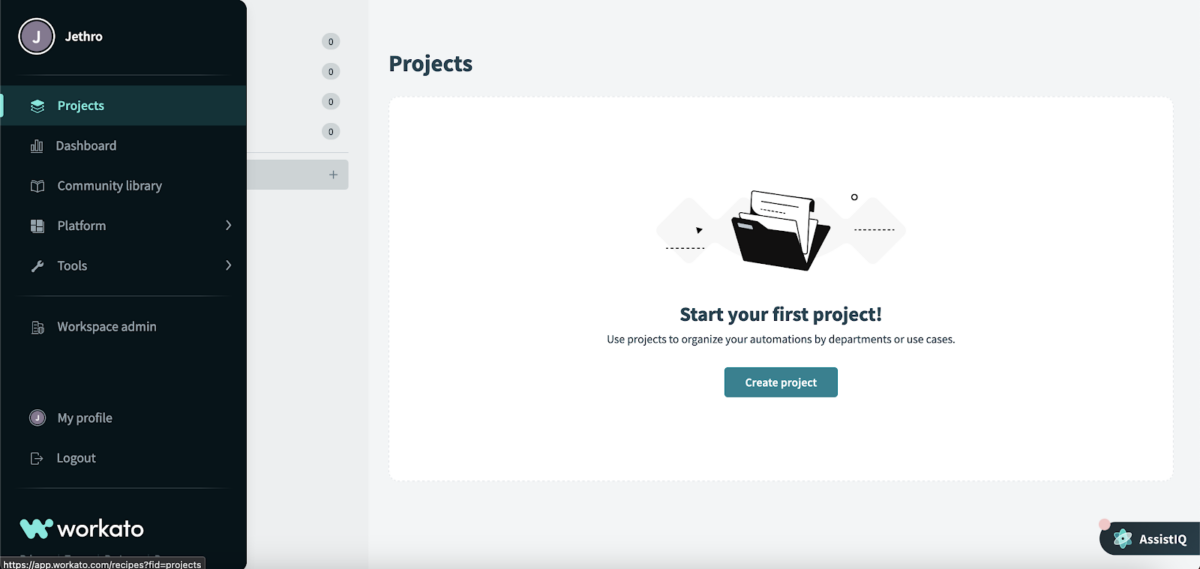
- Next, on “Set up a new project,” add your project name and description. Then click on “Create project.”

Step 2: Connect Asana and Salesforce to Your Workato Project
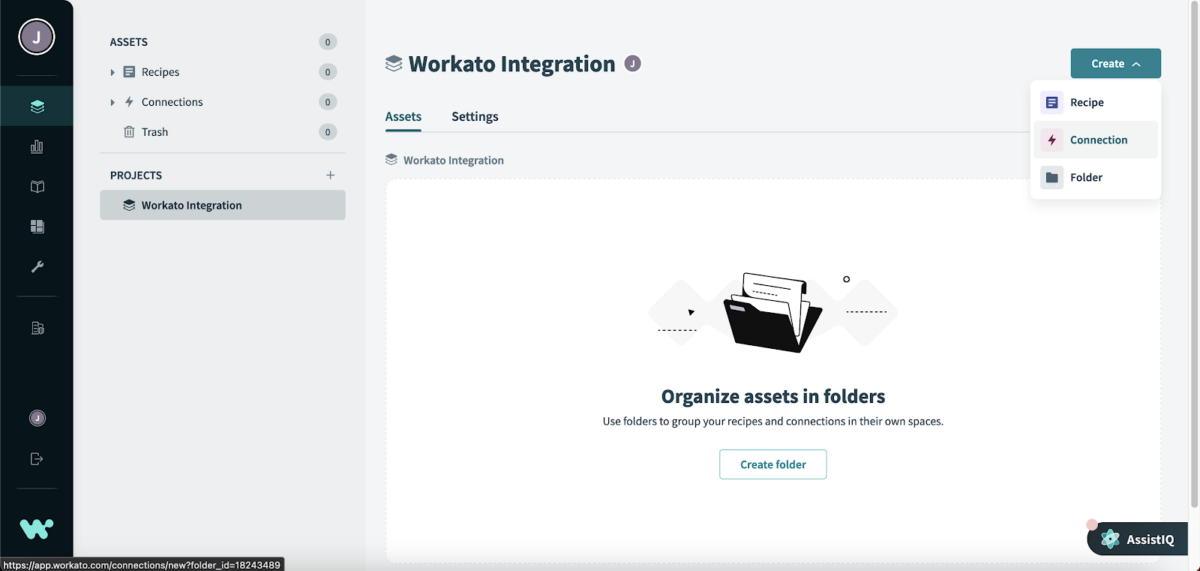
On your project dashboard, you will see the “Create” drop-down button in the top right corner.
Go to the “Connection” drop-down link, and click on it.
- Connect to Asana
- On the connection screen, search for “Asana” and click “Connect.
- You’ll be prompted to authorize Workato to access your Asana account.
- After that, you’ll see the “Connection successfully established” screen.

- Connect to Salesforce
- On the connection screen, search for “Salesforce” and click “Connect.”
- You’ll see the “Connect to Salesforce” screen, then click on “Connect.”
- You’ll be prompted to authorize Workato to access your Salesforce account.
- After that, you will be shown the “Connection successfully established” screen.

Step 3: Building Your Integration Workflow
In this section, we will build out the integration workflow between Asana and Salesforce. Here are some examples of workflows you can create:
- Creating a new Asana task when a lead is created in Salesforce
- Updating the status of a Salesforce opportunity when a task in Asana is completed
- Syncing contact information from Salesforce to Asana
In this tutorial, we will show you how to build a workflow that automatically creates a new Asana task when a lead is created in Salesforce.
Create a new Workato recipe
Workato’s visual interface makes it easy to build custom workflows, even if you don’t have coding experience.
- Go to your project dashboard, where you will see a “Create” drop-down button in the top right corner.
- Click on the “Recipe” drop-down link.
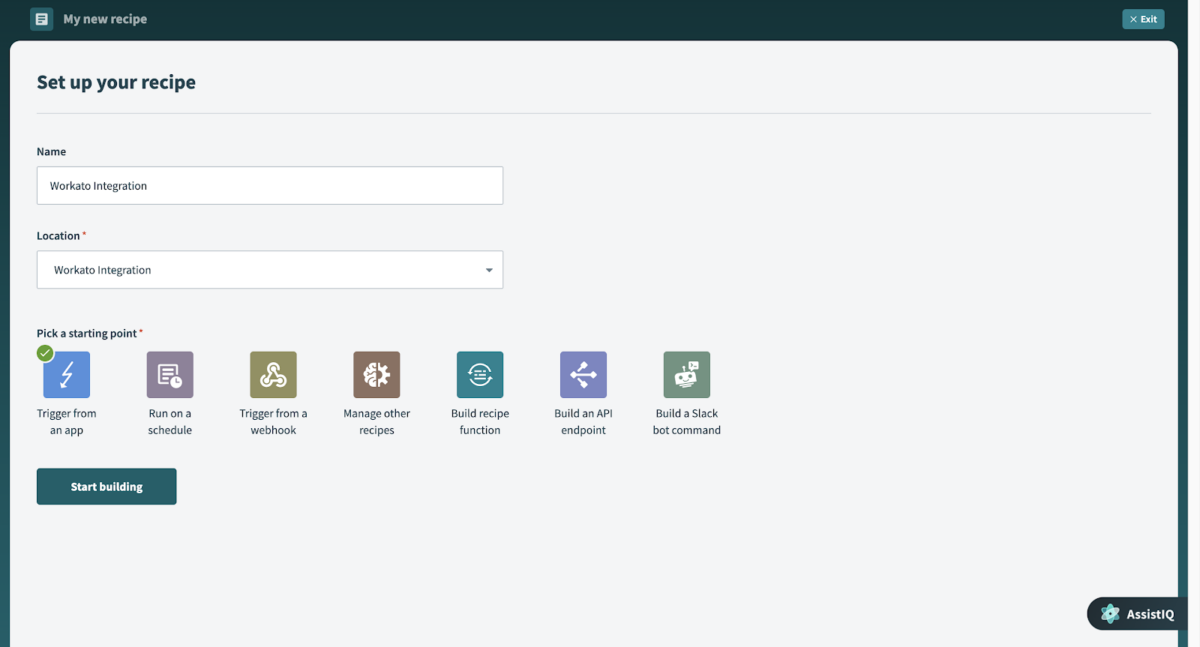
- Next, you will be taken to a screen where you will enter your recipe name, location, and starting point. Only enter the recipe. Leave other fields as default for the tutorial.
- Finally, click on “Start building” to create your recipe.
Select a Trigger
A trigger defines the event that initiates the workflow.
- Go to your newly created recipe visual interface

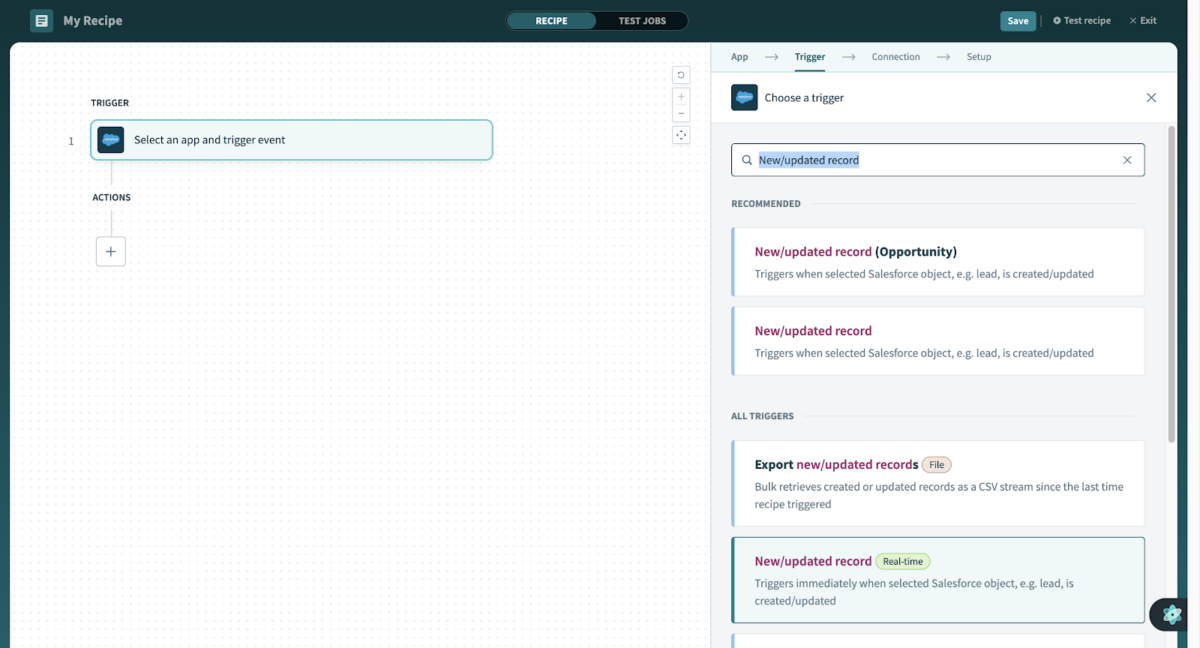
- Select “Salesforce” as the trigger event app
- On the right side of the screen, you’ll see a search bar. Search for “New/updated record,” and select it as the trigger event in Salesforce.
- Note: Select the one with the “Realtime” tag because it triggers immediately when a new lead is created or updated. However, you can select a trigger based on your needs.
Define the Action
An action performs a particular function based on the set trigger.
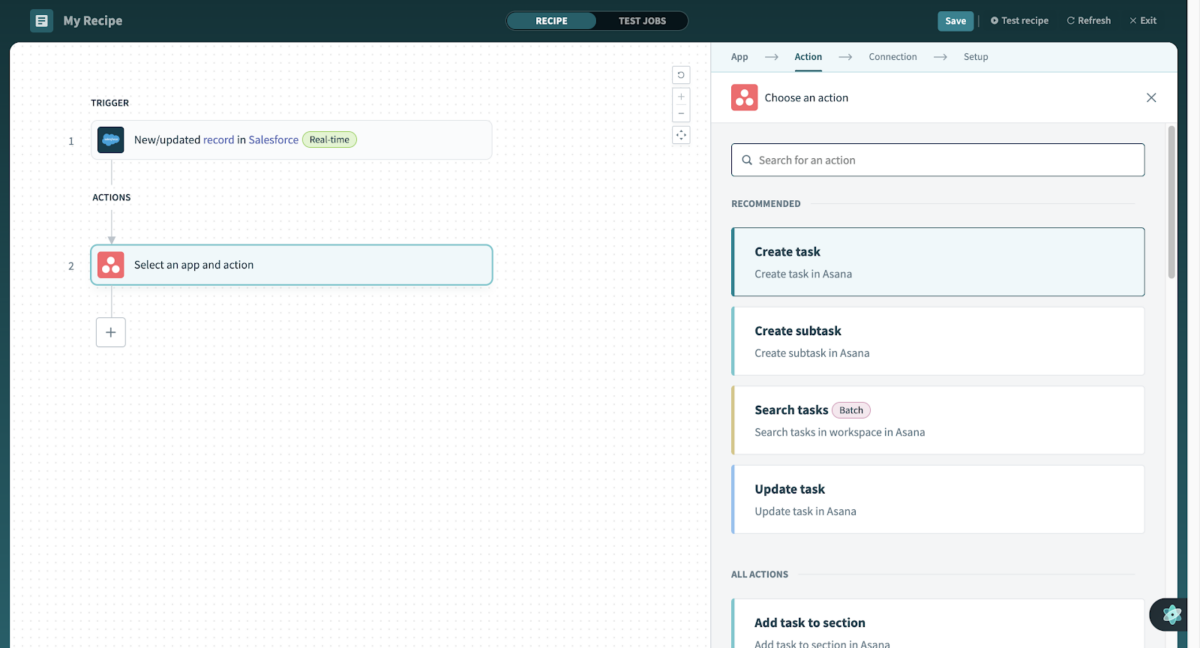
- On your recipe visual interface, click on the plus icon to add an action app. Then select “Action in app.”Select “Asana” as the action app

- On the right side of the screen, you will see a search bar. Search for “Create task” and select it as the action event for Asana.
- This action will create a task in Asana
Map Data Fields
Match the relevant data fields between the trigger and action applications to ensure information flows smoothly.
Mapping Salesforce Data
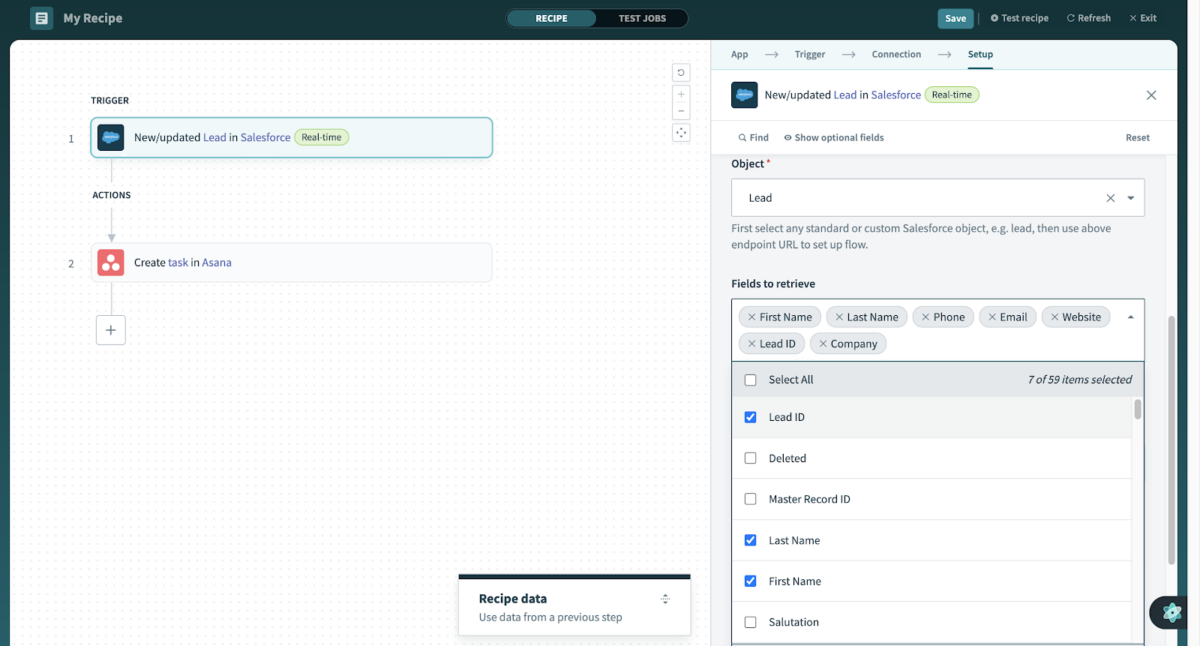
- Click on the Salesforce trigger event app.
- On the right side of the screen, you will see “Set up.”
- You will see the “Object” field. Click on it and search for “Lead,” then select it.
- Next, you will see the “Fields to retrieve” field. Select the fields you want to map out.
- Go to the “When first started, this recipe should pick up events from” field. Select when the recipe should pick up events depending on your needs.
Mapping Asana Data
- Click on the Asana action event app.
- On the right side of the screen, you will see “Set up.”
- Next, add “Workspace ID.” You can find the Workspace ID in the admin console URL, for example, https://app.asana.com/admin/{workspace_gid}.
- Add a “Task name” by either mapping a field or typing your data.
- Add a “Description” by mapping the fields you want.

Map the lead’s name, company, and email address to the Asana task’s title, assignee, and description fields.
Test and Deploy
- Go to the topmost right-hand corner of the recipe visual interface, then click “Save” to save your workflow.
- After that, click on the “Test Recipe” button next to the “Save” button.
- Thoroughly test your workflow to ensure it functions as expected, then deploy it to make it live.
Real-World Use Cases
Let’s explore how companies are leveraging Asana and Salesforce integration across various departments:
Sales
- Track sales opportunities: Sales reps have a single view of sales opportunities in Salesforce, with related tasks and activities in Asana.
- Automate task assignment: Asana tasks are created automatically for new leads in Salesforce, assigning them to the right sales rep.
- Keep Salesforce up to date: Asana task completion updates Salesforce records, keeping opportunity stages, contact information, and other data current.
Marketing
- Streamline campaign management: Marketers manage campaign tasks, deadlines, and resources in Asana while tracking performance in Salesforce.
- Get real-time insights: Campaign performance in Salesforce is updated automatically when tasks are completed in Asana, providing real-time insights.
- Keep contacts current: Asana tasks related to contacts trigger updates in Salesforce contact records, aligning marketing efforts with customer data.
Customer Support
- Create support tickets: New Asana tasks automatically generate support tickets in Salesforce, ensuring quick response to customer issues.
- Update Asana tasks: Changes in support ticket status in Salesforce automatically update related Asana tasks, providing visibility into resolution progress.
Best Practices for Successful Integration
Plan your workflows carefully
- Think about your business processes and how Asana and Salesforce can optimize them.
- Design workflows to minimize manual steps and maximize efficiency.
Regular monitoring and maintenance
- Keep a close eye on the integration’s performance.
- Monitor data flow to identify and address potential errors or issues promptly.
Prioritize security and privacy
- Ensure your integration meets data privacy regulations and security best practices.
- Use strong passwords, enable two-factor authentication, and carefully manage permissions.
Stay updated
- Update the integration as your business processes change.
- Continuously evaluate workflows and make adjustments as needed.
Wrap Up
Integrating Asana and Salesforce is a game-changer for businesses looking to streamline workflows and boost productivity. By eliminating manual tasks, reducing errors, and providing real-time visibility, integration empowers your team to focus on what matters most: delivering exceptional results.
Ready to experience the benefits of a connected workflow? Start building your custom workflows today with Workato and watch your business thrive!
Resources to Get Started
- Workato Documentation: https://support.workato.com/
- Salesforce Help Center: https://help.salesforce.com/
- Asana Help Center: https://asana.com/guide
This post was written by Jethro Magaji. Jethro is a frontend engineer who’s passionate about the tech world and uses creative thinking to solve business problems with a user-centered approach.