How to automate data import from CSV files

Why should you automate your data import?
When it comes to moving data, CSV files are inescapable. Critical business processes like order management, lead management, payroll processing, customer or partner onboarding, data pipelines, and more can require importing data from CSV files into one business app or another.
While business applications do provide tools to import CSVs, the process of manually downloading CSV files and importing them is tedious, and limited with what you can do.
Reduces inefficiencies
For one thing, manually downloading and importing files is slow and inconsistent. You’re relying on a person to be aware whenever a new file is ready, and to be available to do the work, so it’s difficult to consistently meet standards for timeliness.
With time-sensitive data like leads, a day or two of lag time can mean the difference between a viable opportunity and even more wasted time chasing a prospect who’s already moved on with a competitor who got there faster.
Reduces data inaccuracies
For another, most CSV importers are “dumb”. They don’t know how to deal with data that’s missing, incorrectly formatted, or irrelevant, so manually importing CSV data without quality control can clog up your apps with inaccurate, duplicate, or unactionable data.
To work successfully with CSVs you need to build a smart, customized importer to pick up files from any source, extract the raw data, and transform it into a useful format. To show you how to do this, we’ll work through an example.
Related: How to boost data quality with formulas and the API platform
Case study: how to automatically send leads from CSV files to Salesforce
Lead data comes from a wide range of sources. Cloud apps like Marketo, Hubspot and Unbounce output leads from emails and landing pages that can be captured, enriched and routed in real time.
However, leads might also come from less manageable channels. For example, if you’ve ever scanned badges at a tech conference, you’ve probably received a huge CSV file full of lead data after an event. Similarly, many virtual event platforms also output lists of attendees as CSV files.
While leads that arrive by CSV can’t be dealt with in real-time, it is possible to streamline your process to automatically:
- pick up new files
- parse out the relevant data
- put your event leads through the same enrichment and routing pipeline as leads from real-time sources
Let’s look at how to turn a raw CSV file into clean, usable data.
Step 1: Start with a sample dataset
To develop and test our automation, we need some test data to work with. You probably already have a few sample files you can work with. If not, you can use a data-mocking tool like Mockaroo.
Just make sure the format of your file closely matches the production data that you want to process. For this example, we have a CSV file with five columns:
- ID – a row number
- Name
- Company
- Date
For a production use case, each file may have thousands, or tens of thousands of rows, but it’s okay for your sample data set to be smaller while you build and test your recipe.
Step 2: Automate file uploads
To automate uploading your CSV files, you need to consider where they will come from. Files can arrive via a number of routes:
- Via an FTP or SFTP server
- Attached to an email via the Gmail or Outlook apps
- Attached to a Slack message
- Via a cloud drive like Google Drive, Box, or Dropbox
- Cloud storage apps like Amazon S3, Google Cloud Storage, or Azure Blob Storage,
For this example, we’ll pick up CSV files from the Google Drive app. You can make a free Google Drive account to follow along exactly with this tutorial, but the same basic steps will apply, whatever the source of your CSV files.
Create a new recipe
Set up your new recipe, selecting Trigger from app.

Create and name your recipe
Select the Google Drive app.

Select Google Drive as your trigger app
A corporate drive might have hundreds of files added a day, so we’ll choose the New file or folder in folder hierarchy trigger. This way we can narrow our focus only to files in a single folder.

New file or folder in folder hierarchy trigger
If you don’t already have an active connection to Google Drive, you’ll need to sign in to access your drive. Once you’re connected, select the folder your CSV files will be uploaded to.
How to get the right CSV file every time
A key advantage to automating the upload process is being able to get the right file every time. Over time, a Google Drive folder may have hundreds or thousands of almost identically named files.
It’s easy for a person to accidentally grab the wrong one. Our trigger explicitly captures files only as they are added to a particular folder, so you always get the right file straight away.
You can also set a trigger filter to check for the correct file naming convention. For example, you can filter for only files where the filename contains:
event_leads_
This way, the recipe will pick up a file named event_leads_2022-02-01.csv but not purchase_orders.csv.

Adding trigger conditions to ensure that the right CSV file is selected
Test your recipe
Let’s test that our trigger can successfully pick up a CSV file from Google Drive. First, set the recipe to test mode.

Set recipe to test mode
Upload the CSV file of mock data to the correct folder in Google Drive. If necessary, make sure to rename the file to match the naming convention you set up in the trigger filter.

Upload CSV file to Google Drive
Switch back to Workato and click Check now
You should see a successful test. Check the filename to make sure the trigger has picked up the correct file.

Check output for correct file name
If your test doesn’t work, check the following:
- You’re connected to the right Google Drive account
- You uploaded the file to the directory selected in the trigger setup
- The name of the file matches the naming convention you set up in the trigger filter
Step 3: Extract usable data from raw CSV file
Access the CSV app by Workato
The CSV by Workato app lets you process a CSV file from any source, or create a new CSV file from any data. We’ll use it to extract usable data from our raw CSV file.
Create a new step and select Action in app

Select Action in an app
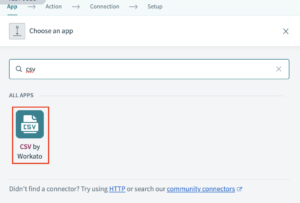
Select the CSV by Workato app.

CSV by Workato
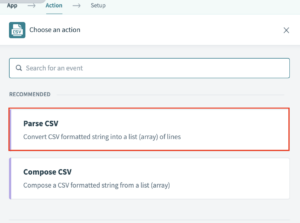
Choose the Parse CSV action.

Select parse CSV
We need to provide the raw contents of the CSV file to be parsed. This part will look a little different depending on where your CSV file originates. In this case, select File Contents from the Google Drive trigger.

Select Files Content datapill from the Google Drive trigger in your 1st step
Configure the CSV parser
Now that we’ve got our CSV file, we need to extract the data from it and make it actionable. To do this, we need to be able to describe how the data is structured. There are three important things we need to know about our CSV data:
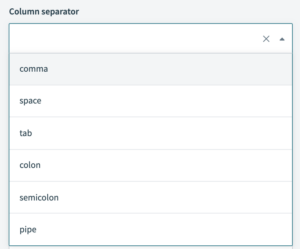
- What character separates each column?
This is usually a comma, but can sometimes be another character, such as tab, semicolon (;) or pipe (|) - How can we know what type of data is in each column?
There are two ways CSV data can be structured:- By column order – this method relies on you knowing that column 2 contains the email address, column 3 contains the name, etc. This method relies on the column order of each file you process being the same.
- By column name – this method relies on the CSV file having a header row which contains the names of each column. This method relies on having consistent column names in each file you process.
- What quote character is used?
Sometimes a value in a CSV file will contain a comma, which is also used to separate columns. To keep the file valid, the value is enclosed in single or double quotes (''or"").
Let’s have a look at the raw CSV file used as a sample.
We can see that:
- Columns are separated by a comma
- We have a header row specifying the column names
- Double quotes are used to enclose values that contain commas
Use this information to configure the Parse CSV action:

Configure pParse CSV action
Test parser configuration in your recipe
To test our parser configuration, switch back to the Test tab. No need to upload a new file, we can just repeat the previous test to use the file we’ve already captured.

Repeat previous job to test recipe
You should see a successful test. Check the output of the Parse CSV step. There should be a list of lines, with 1000 entries. Each entry has properties that match the header line of the CSV:
- id
- name
- company
- date

Check output of Parse CSV step
Step 4: Use the data in your recipe
We’ve turned our raw CSV file into a list of 1000 individual records, each representing a single lead. Now, we can use that data as we would any other list. A couple of examples of what we might do from here:
Upload leads in bulk to a CRM (Salesforce)
If we’re confident in the quality of the data in the CSV file, we can upload the data directly to our CRM — in this case Salesforce — using a batch action.

Upload leads in bulk to Salesforce
Related: How to increase throughput using batch processing
Cleanse, validate and transform data using Repeat action
However, we may not be completely confident in the quality of the source data in our CSV file. In this case, we can use a Repeat action to cleanse and validate the data line by line.

Use Repeat action to cleanse and validate the data
Learn more: other ways to access CSV data
We’ve looked at how to use the CSV Parser app to extract data from a CSV, since this will work no matter where your CSV file comes from.
Some apps also have convenience methods to make it easier to work with CSV data. For example, the Dropbox connector has specialized triggers for capturing new/updated CSV files or even new lines in an existing file.
Remember that to use specialized triggers like these, you still need to provide information about the CSV file, like header row, column separator, etc. So as in the example above, make sure you check an example of the raw CSV file so that you can correctly set up the trigger.


