Bring workflows front and center with your first Workbot in Slack
Workbot is a platform to build custom applications for both Slack and Microsoft Teams. By enabling users to trigger workflows, retrieve information from connected apps, and receive notifications, you can uplevel your organization and bring your business-critical work into an everyday tool.
Learn better with video? Check out our recent Product Hour!
Why Workbot?
You’re probably familiar with the wealth of apps for Slack: Google Drive, Jira, Miro, Zoom, and countless more. So, what’s the difference between those and Workbot?
There are three primary reasons to choose Workbot: customization, security, and breadth. Single-app bots are great for accessing information or notification for a single app, but fall short for orchestrating workflows across apps, and have very little customization. Additionally, Workbot can be centrally managed and governed, giving peace of mind when managing app data and users.
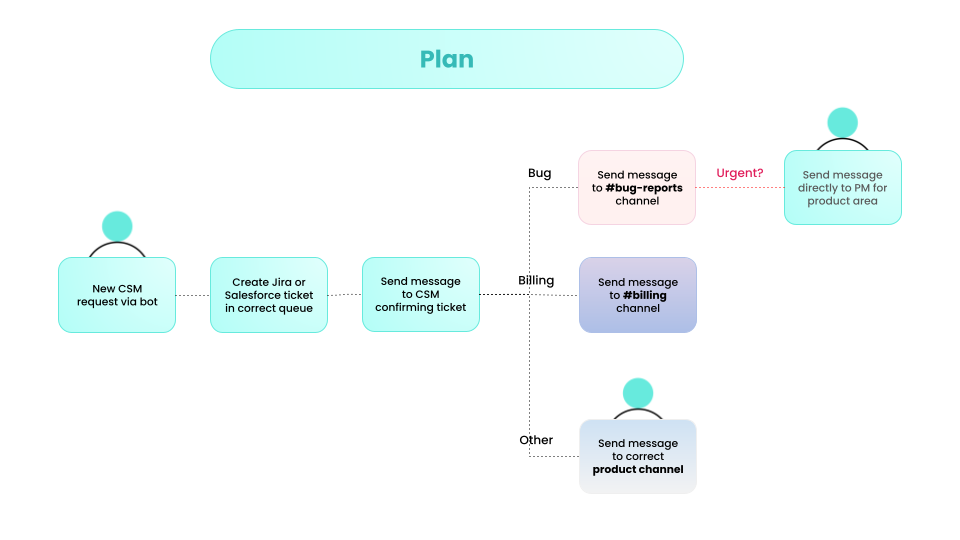
Let’s walk through an example of a Workbot implementation: a CSMBot, to help our Customer Success and Product teams manage inbound requests and bugs from customers.
Step 1: Plan
The first step of any automation is planning – what problem are you solving, and who needs to be included in creating a solution?
For our example, our planning involves:
- Talking to CSMs to determine their pain points around entering feedback and requests from customers
- Talking to Product Managers and Product Support to determine how they would like to interact with CSMs regarding feedback and bugs
- Checking with the Salesforce and Jira operations teams to review the available fields – how do we determine the CSM assigned? What type of ticket should we create for different types of requests?
After talking with these groups, we have a good idea of how we can quickly go from customer interaction to triage to resolution, all with the help of Workbot.
Step 2: Set up
Setting up a new bot is as simple as creating a new custom bot, installing it into your Slack workspace, and authenticating with your Slack account. For development, we recommend setting up a free plan or sandbox Slack workspace to not disrupt business operations.
- Create a custom bot:
- Navigate to Platform > Workbot, then click into the Custom Bots tab.
- Select New custom bot, then select Workbot for Slack in the Application field.
- Give your bot a name that represents the project – for our case, we would use CSMBot.
- Select Create new app to open the Slack API interface. Select your workspace, review the configuration, and follow the guided instructions to create the app.
- Install in your Slack workspace:
- To install the app, navigate to Basic Information, and click into the Install your app checklist item. Select the correct Slack workspace, then click Allow.
- While in Basic Information, scroll to find the App Credentials. Copy the Client ID, Client Secret, and Signing Secret over to the Workato interface to finish tying Slack and Workato together. Select Done in the Workato interface when complete.
- Optionally, you can review the values found in Step 4 of the Workato custom bot creation – the values listed should all be carried over from app creation, but can be reviewed and adjusted.
- Authenticating with your Slack account:
- In the Workato interface, navigate Platform > Workbot > Installed bots. Select Add bot to team to open the authentication menu.
- Authenticate with Slack to finish the installation process.
And you’re installed! In the next step, we’ll add logic and Workbot actions to make the bot functional.
Note that while in the Slack interface, you can also control settings such as display information, collaborators, webhooks, slash commands, and OAuth scopes and permissions.
Step 3: Design
Now let’s get down to business: building out our first command! Commands are the requests your users make to your bot, which you then tackle with your Workato recipes.
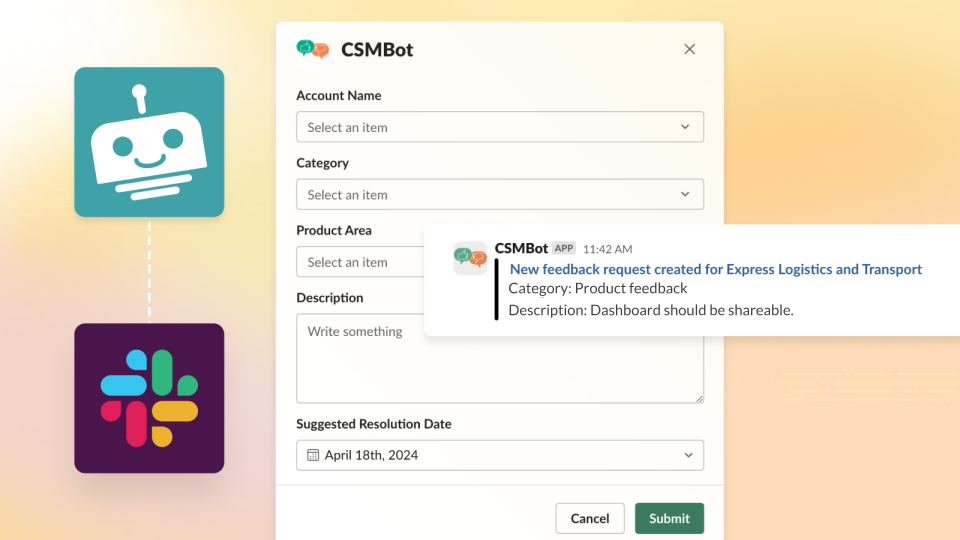
Our first command is going to be for the CSM to quickly create a ticket. From talking with the CSMs and Product teams, we have a short list of fields we need to ask for to file any type of ticket:
- Account, ideally tied to Salesforce
- Category, to help route the ticket
- Product area, to help route the ticket
- Description, to provide context
- Supporting links, to provide context
- Suggested resolution date, to indicate urgency
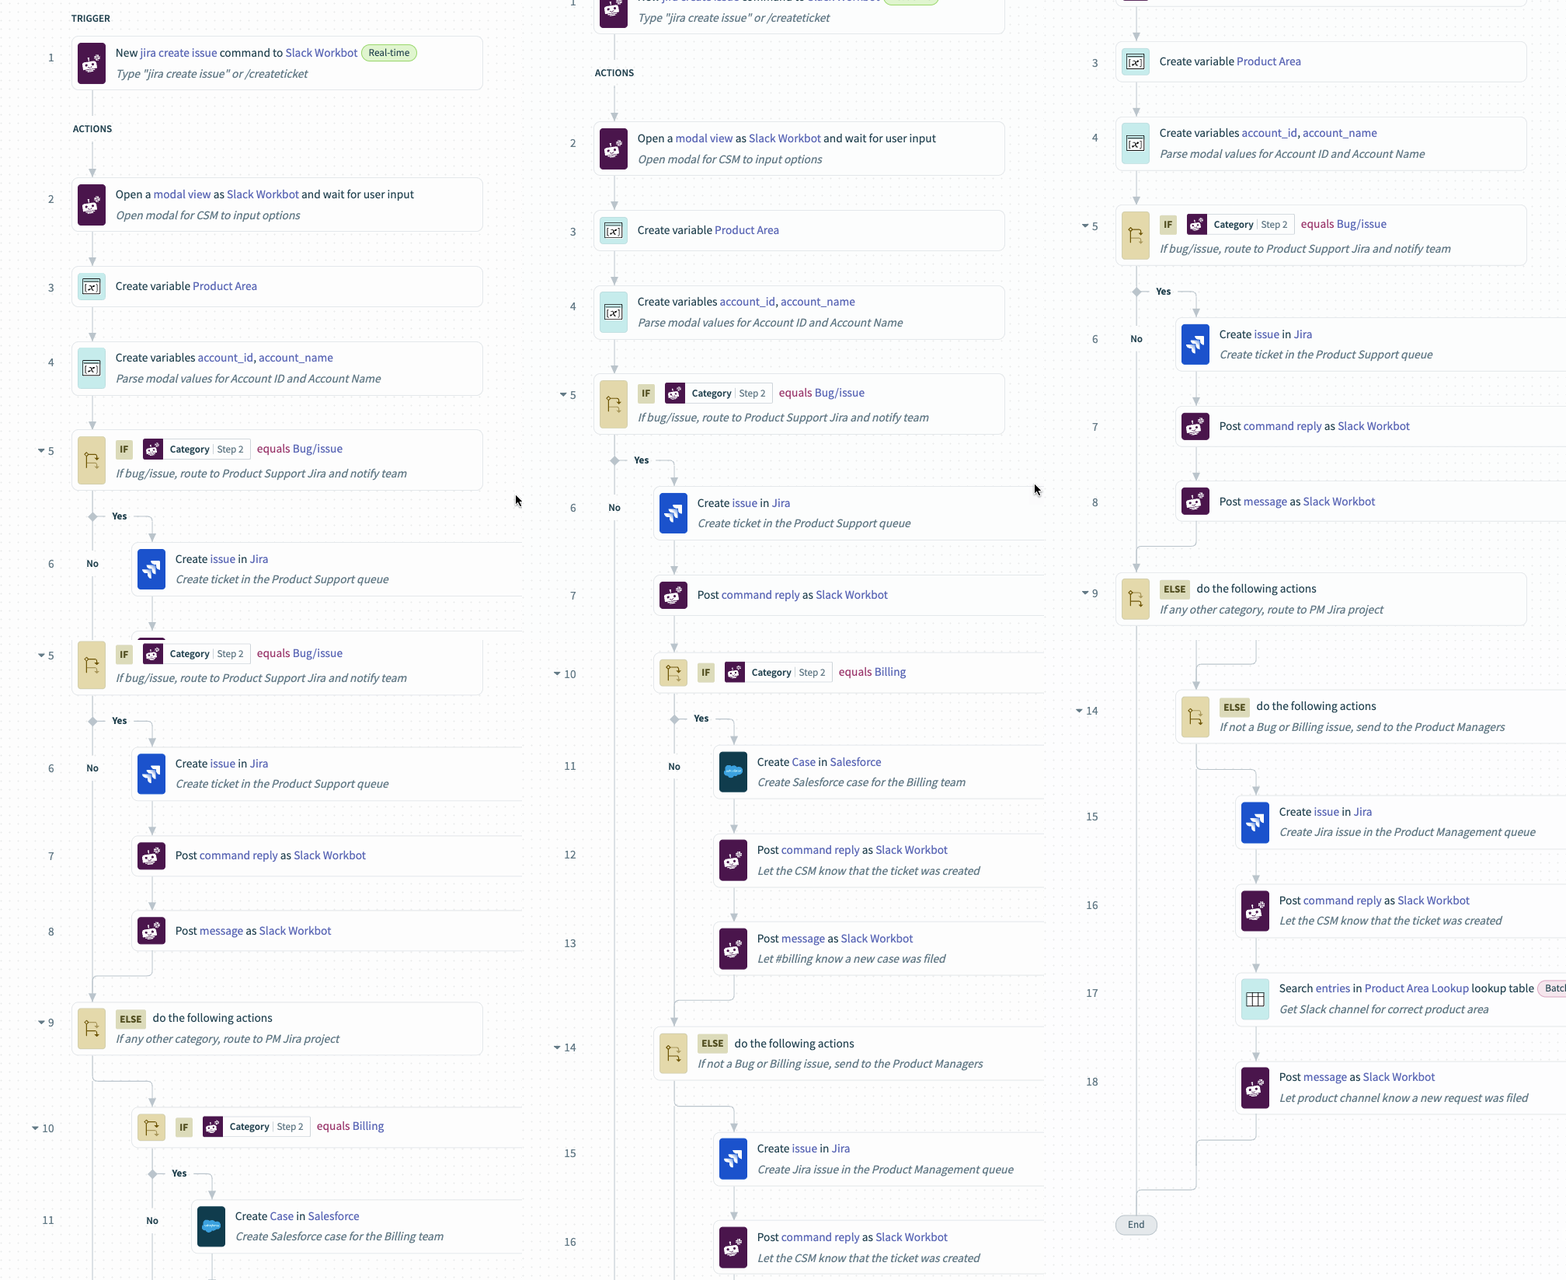
To create a new command, navigate to your newly installed bot under Platform > Workbot > Installed bots. Once you open your bot, you can elect to create a new command with the arrow in the upper right. This step creates a recipe with a few steps built in. The core steps to our recipe haven’t changed from classic Workato recipes: start with a trigger, followed by actions!
Our trigger is a New command, which we configure with a message, also known as what we want the user to type to the bot to trigger this recipe.
Our actions for this example use a variety of apps:
- Open modal with Workbot
- Create issue with Jira
- Create case with Salesforce
- Post command reply with Workbot
- Post message with Workbot
The modal and messages can be configured using Slack’s block framework, an easy way to customize the order and appearance of information and inputs. Slack provides a block kit builder to help plan your design – you can see an example modal for the CSMBot experience here.
Creating a dynamic menu
In the CSMBot example, we want to pull Salesforce accounts where the given user is the assigned CSM; both for the sake of a good experience, but also for compliance in not being able to log feedback for any account.
To create a dynamic menu, you can create a separate recipe with a New dynamic menu event trigger. These recipes work similarly to recipe functions, in that it is called at runtime, runs the logic with any parameters, and returns values according to the recipe.
In the dynamic menu recipe for CSMBot:
- Trigger: New dynamic menu event, with parameter csm_name
- Action: Search Accounts using SOQL query WHERE clause, inputting the CSM name, and typeahead value
- Return menu options, attaching the list of returned accounts as the source list
In the command recipe for CSMBot:
- Add a select menu input block with Menu options = Dynamic
- Select the dynamic menu recipe you created
- Pass in the parameter csm_name, with a dynamic datapill value based on the recipe trigger
Adding a slash command
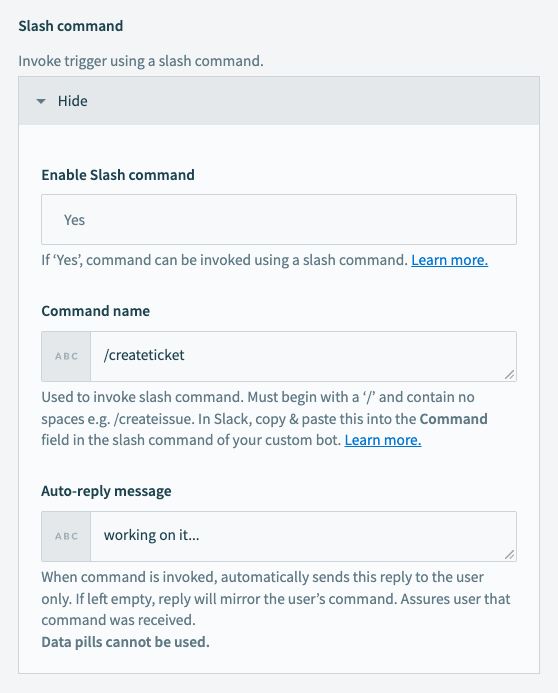
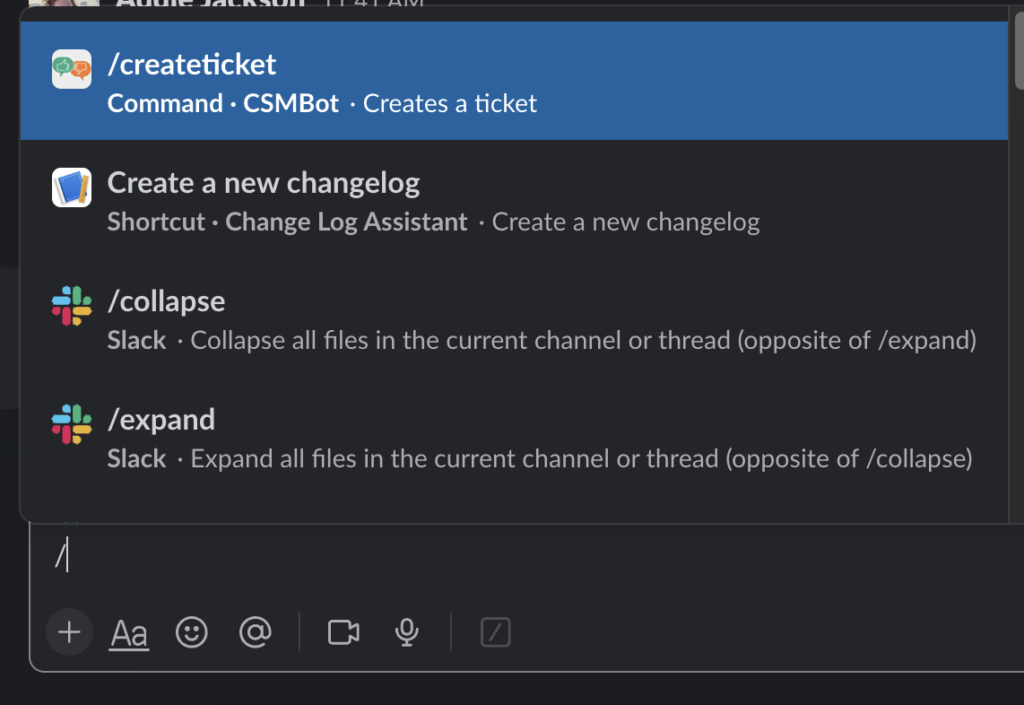
Slash commands are a great way to make it easy to use your app. Instead of remembering a specific message to send to the bot, users can use /createticket or a similar command to launch the modal.
To create a slash command, toggle the Enable Slash command option in the command trigger. Fill out the details of the slash command, then scroll to the top to copy the webhook URL.
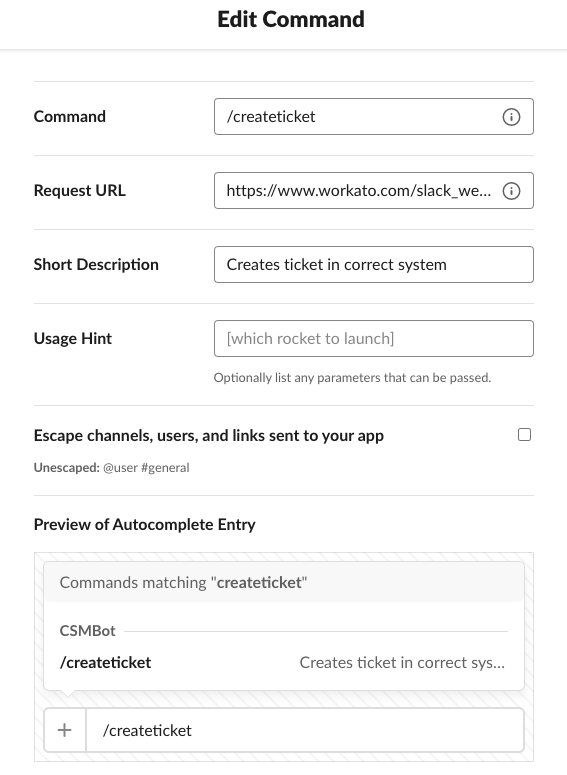
Back in the Slack API interface, navigate to Slash Commands, click Create New Command, then enter the same Command, Request URL, and a short description to give users visibility. After saving in both the Workato and Slack interfaces, you should see your slash command as an option after typing a `/`!
Step 4: Test and launch!
Hopefully you’ve been testing as we go, but if not, pause here and try running a ticket through your bot. If you are error-free, congrats!
When developing and beginning to share your automation with others, iterative testing is critical to rapidly improving your work. This includes testing as you make changes, but also unit testing, integration testing, and user acceptance testing to validate that your solution is secure and sound, and actually meets the users’ needs.
After your testing is complete, you can move on to considering distribution and working with your company’s Slack admins to roll out your solution to those in need.
What comes next?
For our CSMBot example, there are a few next steps possible, such as adding a way for CSMs to request all tickets for a given customer before hopping on a call, or adding an app home page to provide an even easier way to log a ticket or keep up with their open tickets.
The world is your oyster – there is always more functionality and experiences to add, and ways to iterate and refine your bot. Check out our community library and pre-built Knowledge Workbot Accelerator for inspiration!
